Green Chile Chicken Enchilada Casserole
Green Chile Chicken Enchilada Casserole has all the flavor of classic enchiladas without the time spent rolling each tortilla by hand. Sometimes called “stacked” or “lazy” enchiladas, this layered version is popular in the American Southwest, where flat, stacked enchiladas are a long-standing tradition, especially in New Mexico.
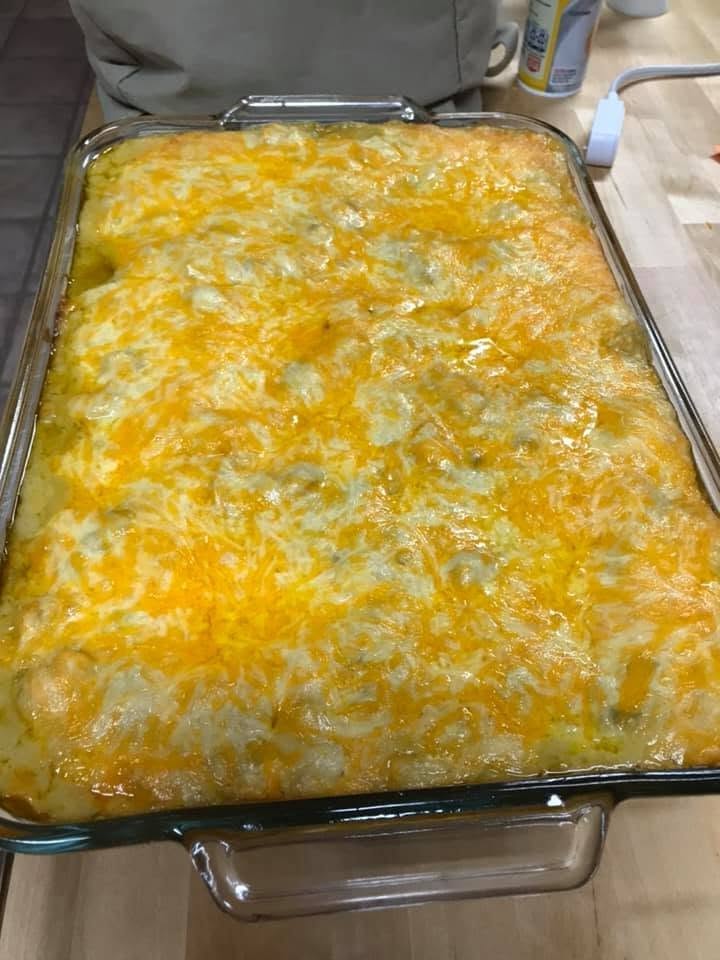
Tender chicken is folded into a creamy filling of cream of chicken soup, sour cream and diced green chiles. That filling is layered with soft corn tortillas, tangy green enchilada sauce and melted cheddar, then baked until golden and bubbling.
The tortillas soak up the sauce and turn tender, almost like lasagna noodles, and each slice reveals neat layers of chicken, cheese and chile. It’s a weeknight dinner, a potluck favorite and a make-ahead meal all in one, the kind of casserole that disappears fast and earns a permanent spot in your recipe box.
Why People Will Love Green Chile Chicken Enchilada Casserole Recipe
It’s all the flavor of enchiladas with half the work. There’s no dipping, filling or rolling. Just layer and bake.
The filling is creamy and comforting. Cream of chicken soup and sour cream make a rich, velvety filling that keeps the chicken moist and tender.
The green chile tang is mild and crowd-pleasing. Green chile and enchilada sauce add a gentle, zesty flavor without much heat, so kids and spice-shy eaters enjoy it too.
There’s lots of cheese. Two full cups of cheddar, both inside and on top, give you gooey layers and a golden crust.
It uses pantry and fridge staples. Canned soup, canned sauce, canned chiles, tortillas, cheese and leftover chicken are easy to keep on hand.
Leftover or rotisserie chicken works perfectly. It turns leftovers into a brand-new meal and keeps prep under 15 minutes.
It slices into neat squares. The layers hold together, so it’s easy to serve and looks great on a plate.
You can make it ahead. Assemble it in advance, refrigerate it, and bake it when you’re ready. It’s ideal for busy nights, guests or meal prep.
It’s great for feeding a crowd or bringing to others. It travels well, so it’s a natural for potlucks, family gatherings, new parents or sick friends.
You can customize it endlessly. Add beans, corn, spinach or spices, or switch the cheese, and it still works.
Leftovers taste even better. The flavors meld overnight and the casserole reheats beautifully.
Key Ingredients
Cooked chicken: This is the main protein. Shredded chicken soaks up the creamy sauce, and diced chicken gives heartier bites. Rotisserie chicken is a great time-saver and adds extra flavor from its seasoned skin and juices. Poached, baked or leftover grilled chicken also works.
Cream of chicken soup: It’s the base of the filling. It makes the chicken creamy, rich and savory, binds the layers together and keeps the casserole moist during baking.
Sour cream: It adds tangy richness and a lighter, smoother texture to the filling. It also balances the saltiness of the soup and sauce.
Diced green chiles: They bring a mild, slightly smoky, vegetal flavor that defines the dish. Drain them if they’re watery, so the filling doesn’t turn soggy.
Green chile enchilada sauce: It’s the flavor backbone. Made from green chiles, tomatillos and spices, it’s bright, tangy and gently spiced. It softens the tortillas, so be generous with it, especially on top.
Corn tortillas: They’re the traditional choice for enchiladas, with an earthy corn flavor. Corn tortillas also hold their structure better than flour in a baked casserole, softening without turning mushy.
Shredded cheddar: It melts into creamy layers and forms a golden, bubbly top. Shredding your own from a block melts more smoothly than pre-shredded cheese, which contains anti-caking agents.
Salt and pepper: Season lightly. The canned soup, sauce, chiles and cheese all contain salt, so taste the filling before adding more.
Expert Tips
Warm the tortillas first. Corn tortillas can crack when cold. Heat them briefly in a dry skillet, or wrap them in a damp paper towel and microwave for 20–30 seconds, so they turn soft and pliable.
For extra flavor, lightly fry the tortillas. A quick dip in hot oil, about 5 seconds per side, keeps them from getting soggy and adds a toasty, authentic enchilada flavor.
Cover the tortillas completely with sauce. Any exposed tortilla edges on top will dry out and turn hard in the oven. Spread the final layer of sauce all the way to the edges.
Shred your own cheese. Block cheddar melts smoother and creamier. Mixing cheddar with Monterey Jack or pepper jack gives a better melt and more flavor.
Season the filling well. Taste it before layering. A pinch of cumin, garlic powder or onion powder adds depth, and a squeeze of lime brightens it.
Use quality enchilada sauce. The sauce flavors the whole dish, so pick one you love, or make your own from roasted green chiles or tomatillos.
Upgrade the chiles. Use roasted Hatch green chile instead of canned for a smokier, more authentic Southwestern flavor.
Fill the gaps. Tear or cut tortillas to cover each layer completely. This keeps the layers distinct and helps the casserole hold together when sliced.
Don’t skip the rest. Letting it rest for 5–10 minutes gives the sauce and cheese time to set, so it slices cleanly instead of sliding apart.
Brown the top under the broiler. For a golden, bubbly finish, broil for the last 1–2 minutes. Watch closely so it doesn’t burn.
Add fresh garnishes after baking. Cilantro, green onions or avocado make a rich casserole taste lighter and fresher.
Green Chile Chicken Enchilada Casserole
Ingredients
2 cups cooked chicken, shredded or chopped
1 can (10.5 oz) condensed cream of chicken soup
⅓ cup sour cream
1 can (4 oz) diced green chiles, drained if needed
1 can (15 oz) green chile enchilada sauce, divided
12 small (6-inch) corn tortillas
2 cups shredded cheddar cheese, divided
Salt and pepper, to taste
Topping ideas
Sour cream
Salsa
Shredded lettuce
Chopped tomatoes
Jalapeño slices
Instructions
Step 1: Heat the oven
Preheat your oven to 350°F (175°C).
Step 2: Mix the chicken filling
In a large mixing bowl, combine the cream of chicken soup, sour cream, ⅓ cup of the enchilada sauce, salt and pepper.
Fold in the chicken and green chiles and stir until well blended.
Step 3: Prepare the pan
Spoon ¼ cup of enchilada sauce into an 8×8-inch baking dish and spread it evenly across the bottom.
Line the dish with 3 tortillas, cutting or tearing them into halves to fill any empty spaces.
Step 4: Add the first layer
Spread one-third of the chicken filling evenly over the tortillas.
Pour ⅓ cup of enchilada sauce over the filling, then lay 3 more tortillas on top.
Step 5: Add the second layer
Spread another third of the filling over the tortillas.
Drizzle with ⅓ cup of enchilada sauce and sprinkle with 1 cup of cheese.
Top with 3 more tortillas.
Step 6: Add the third layer
Spread the last of the filling over the tortillas and pour ⅓ cup of enchilada sauce over it.
Cover with the remaining 3 tortillas.
Step 7: Sauce and cheese the top
Pour the rest of the enchilada sauce over the casserole, covering the tortillas as completely as possible so they stay soft and don’t dry out while baking.
Scatter the remaining 1 cup of cheese over the sauce.
Step 8: Bake
Bake for 25–30 minutes, until the cheese has melted and the casserole is bubbling.
Step 9: Let it set
Take the casserole out of the oven and let it stand for 5–10 minutes.
Resting helps it hold together, so it’s easier to cut into neat portions.
Note
Nutrition information does not include toppings.
Important Notes When Making Green Chile Chicken Enchilada Casserole
Use the right pan size. This recipe is made for an 8×8-inch baking dish. To double it, use a 9×13-inch dish and add 10–15 minutes to the baking time.
Manage the sauce carefully. The 15-oz can is divided across the layers: ⅓ cup in the filling, ¼ cup on the bottom, ⅓ cup between each of the three layers, and the rest on top. Measure as you go so there’s enough left to cover the top.
Heat it all the way through. Since the chicken is already cooked, you’re mainly reheating and melting. The center should reach 165°F (74°C), especially if the casserole was made ahead and chilled.
Cold casseroles need more time. If you bake straight from the fridge, add 10–15 minutes, and cover with foil for the first part so the top doesn’t over-brown.
The dish is high in sodium. Canned soup, enchilada sauce, green chiles and cheese all add salt. For a lower-sodium version, use reduced-sodium soup and season lightly.
The tortillas may not be gluten-free. Corn tortillas usually are, but cream of chicken soup typically contains wheat flour. Use a certified gluten-free soup or a homemade sauce to make the dish gluten-free.
It’s mild by default. Canned green chiles and most green enchilada sauces are mild. For more heat, use hot green chiles, add jalapeños or use a spicy enchilada sauce.
Storage: Cover and refrigerate leftovers for up to 4 days.
Freezing: Freeze the assembled, unbaked casserole (or the baked casserole) tightly wrapped for up to 3 months. Thaw overnight in the fridge before baking.
Reheating: Reheat individual portions in the microwave, or cover the dish with foil and warm it at 350°F (175°C) for 15–20 minutes. Add a splash of enchilada sauce if it seems dry.
The nutrition estimate doesn’t include toppings.
How to Enjoy Green Chile Chicken Enchilada Casserole After Cooking
Let it rest, then slice. After 5–10 minutes of resting, cut the casserole into 6 squares with a sharp knife and lift them out with a flat spatula. The first piece is always the hardest, so don’t worry if it’s messy.
Add toppings. Set out a toppings bar so everyone can customize their plate:
A dollop of cool sour cream or Mexican crema
Fresh salsa or pico de gallo
Crisp shredded lettuce for crunch
Diced fresh tomatoes
Sliced fresh or pickled jalapeños for heat
Chopped cilantro and sliced green onions
Diced avocado or a scoop of guacamole
Crumbled cotija or queso fresco
A squeeze of lime
Sliced black olives
Pick a side.
Mexican or Spanish rice, a classic pairing
Refried or black beans
Chips with salsa and guacamole
A fresh green salad with lime-cilantro dressing to balance the richness
Mexican street corn (elote) or a corn salad
Roasted vegetables, like zucchini, peppers and onions
Cabbage slaw for a crisp, tangy crunch
Choose a drink.
Fresh limeade or lemonade
Agua fresca, such as watermelon, horchata or jamaica
A cold Mexican lager with lime
Iced tea or sparkling water with citrus
Try other ways to serve it.
Family-style: Bring the whole dish to the table and let everyone serve themselves.
Bowls: Spoon a portion over rice and top with lettuce, beans and salsa.
Potluck or gatherings: Keep it warm, covered with foil, and serve the toppings on the side.
Meal prep: Divide into containers with rice and beans for easy lunches.
Breakfast: Top a reheated square with a fried egg and salsa.
Enjoy the leftovers. The casserole often tastes even better the next day, after the flavors have blended. Reheat individual squares in the microwave for 1–2 minutes, or warm the dish in the oven so the edges get a little crispy again.
Nutrition Information (Estimated, Per Serving)
These estimates assume 6 servings, made with regular cream of chicken soup and without toppings.
Calories: 460 kcal | Total Fat: 24.5 g | Saturated Fat: 11 g | Monounsaturated Fat: 6.8 g | Polyunsaturated Fat: 3.3 g | Cholesterol: 88 mg | Sodium: 1,050–1,200 mg (depending on added salt) | Total Carbohydrates: 33.8 g | Dietary Fiber: 3.9 g | Sugars: 2.7 g | Protein: 27.9 g
Smart FAQs About This Recipe
What’s the difference between an enchilada casserole and regular enchiladas?
Regular enchiladas are filled and rolled one at a time. An enchilada casserole layers the same ingredients flat, like lasagna. Stacked enchiladas are a traditional style in New Mexico, and the casserole version is faster, easier to make for a crowd and simpler to serve.
Can I use flour tortillas instead of corn?
Yes. Flour tortillas make a softer, more bread-like casserole, while corn tortillas give a more authentic flavor and hold their shape better. Use 8-inch flour tortillas cut to fit the pan. You’ll likely need fewer, about 6–8.
Is this casserole spicy?
No, it’s usually mild. Canned green chiles and most green enchilada sauces add flavor more than heat. For more spice, use hot green chiles, add diced jalapeños, use pepper jack cheese or choose a hot enchilada sauce.
Can I make it without canned soup?
Yes. Make a simple sauce by melting 2 tablespoons of butter, whisking in 2 tablespoons of flour, then adding ¾ cup of chicken broth and ¼ cup of milk. Simmer until thick, and season with salt, pepper and garlic powder. It tastes fresher and lets you control the sodium.
What can I add to make it more filling?
Add a can of drained black or pinto beans, a cup of corn, sautéed onions and peppers, or fresh spinach to the filling. These add fiber, nutrients and color while stretching the casserole to feed more people.
How do I keep the tortillas from getting soggy?
Warm or lightly fry the tortillas before layering, drain the green chiles well, and don’t add extra liquid to the filling. Also make sure the oven is fully preheated, so the casserole bakes rather than steams.
Why did the top tortillas turn hard and crunchy?
Any part of the tortillas not covered with sauce dries out in the oven. Spread the final layer of sauce all the way to the edges and cover it with cheese. If the edges still dry out, cover the dish loosely with foil for the first 15 minutes of baking.
Can I assemble it ahead of time?
Yes. Assemble the casserole, cover it tightly, and refrigerate it for up to 24 hours. Let it sit at room temperature for 20–30 minutes before baking, or add 10–15 minutes to the baking time if it goes straight from the fridge.
How do I know when it’s done?
The cheese should be fully melted and lightly golden, and the sauce should bubble around the edges. Since all the ingredients are already cooked, you mainly want it hot all the way through. Check that the center has reached 165°F (74°C).
Can I freeze it?
Yes. Freeze it either unbaked or baked. Wrap it tightly in plastic wrap and foil, and freeze for up to 3 months. Thaw overnight in the fridge, then bake at 350°F (175°C) for 35–45 minutes, covering it with foil for the first half so the top doesn’t brown too quickly.